In this tutorial, you will learn how to control the quantity of the specific set of products based on a logical condition
Here in this tutorial, we considered the condition if the discounted product added more than our defined quantity it will notify/alert the end-user but once you understand the concept the same can be applied in different scenarios with little modifications
Through this process, you will learn the following from the technical/development side
woocommerce_add_to_cart_validation filter hook
woocommerce_update_cart_validation filter hook
wc_add_notice WooCommerce notice function
wc_get_product function to get product instance
get_regular_price product instance method
get_sale_price product instance method
generate_cart_id cart instance method
find_product_in_cart cart instance method
get_cart_item cart instance method
Sample notice
Add to cart validation
Line 2: we defined a named constant MAX_QUANTITY where it helps how much discounted product a user can add to a cart
Line 4: we called the filter hook function add_filter with the tag woocommerce_add_to_cart_validation for the function validate_discounted_prdct_qty_limitation
The filter woocommerce_add_to_cart_validation is responsible for doing validation while adding the product to the cart
Line 19: Lets we see the inner working of the hooked function validate_discounted_prdct_qty_limitation
The hooked function has three arguments
$passed Boolean value to pass or fail the validation
$product_id an integer value which is the product id that is the primary key of that product
$quantity an integer which has the intended quantity of the product
Line 20: we call the function wc_get_product where we passed our product id which returns the right product object by making using of a factory pattern class WC_Product_Factory which return any one of the product object types WC_Product_Simple, WC_Product_Grouped, WC_Product_External, WC_Product_Variable, etc.,
Line 22: we get the products parent id if the product doesn’t have a parent which return 0 else it returns the parent product id
Line 23: if the product id isn’t empty (possible for variable products child product or for any custom product type) then assign the variable $product_id with the product’s parent id
Line 27: we call our validator function validate_product_qty and return it
On the shop page, when the threshold limit is crossed instead of showing the notice on shop page WooCommerce redirects to a specific product page and alerts the notice which is the default flow of the ajax add to cart functionality
Update cart validation
Line 3: we hooked our custom function on_update_cart_limit_qty to the hook tag woocommerce_update_cart_validation which is responsible for update cart validation
Therefore this custom function solely control the WooCommerce cart page validation and previous section we explored the hook woocommerce_add_to_cart_validation which can be triggered on the shop page or product page
Line 19: the function on_update_cart_limit_qty is a simple one-line function which calls the validation function validate_product_qty
Lets we see the arguments of this function
$passed Boolean value to pass or fail the validation
$cart_item_key string value, to be clear WooCommerce generated MD5 which is used as a key for every cart item in the cart
$values array value, currently updated product cart item properties
$quantity int value, which has the product’s updated quantity
Show validate message
Line 12: you may be surprised by seeing this function as earlier we saw that this function as the validation function but here it just the message notification function
The reason for this is we abstracted our validation logic in other business logic function is_discounted_prdct_qty_exceeded so you can reuse all the function up to we discussed (including this) without modifying anything and interpolate your desired validation business logic function into the if condition or even if you’re using these functions as object-oriented methods then you can inject the validation business logic as dependency injection (DI)
This function accepts three arguments they are
$product_id int value, which holds the product’s id (Primary Key)
$quantity int value, validating product quantity which can be verified against our MAX_QUANTITY constant
$action_type string value, a switcher key which accepts either add or update as value depends on this value we slightly modify the quantity calculation logic in the function is_discounted_prdct_qty_exceeded
Line 13: here whatever argument values we received are directly passed to the validation business logic function is_discounted_prdct_qty_exceeded
Line 15: the variable $output_string holds the string returned by the WordPress function wp_sprintf
Line 21: the WooCommerce function wc_add_notice is used to display the validation message
If product quantity exceeded the threshold limit then we return false else true
Validation business logic
Lets we see about the helper function is_discounted_prdct_qty_exceeded
Line 13: We passed the argument $product_id to the WooCommerce function wc_get_product which return the WC_Product object, if the product exists for the given product id else, return null if not found and if anything wrong return false
Line 14: we call the method get_regular_price of the WC_Product object variable $product_obj this method is responsible to return the product’s regular price i.e. actual price
Line 15: the method get_sale_price is similar to get_regular_price but it returns the discounted price
Line 17: we called the cart instance method generate_cart_id which return the unique cart id of the passed product id
Line 18: the cart instance method find_product_in_cart return the cart item key if the product is in the cart else return an empty string, this method is used to find whether our product is already in the cart or not
We will use this variable in if condition while adding a product to the cart we will see the purpose of this variable later
Line 20: this conditional logic is used to check whether our product is the discounted one or not
! empty( $sale_price ) here we check whether our sale price is not empty
(float) $sale_price < (float) $regular_price here we check if the sale price is lesser than the regular price to decide whether the product is discounted or not
Line 23: this conditional block is executed only when we are adding the product to the cart and the same product already present in the cart
'add' === $action_type here we checking is our action type is add if true means the next expression will be executed
! empty( $find_product_in_cart ) here we check if the product already in the cart
The reason for checking this condition is considering like this if the product which we are adding is already in the cart with a quantity 2 and the currently adding product quantity is 3 means we need to check the sum of both cart and added product quantity which will be 5 against our threshold value 3 instead of that if we check only added quantity with the threshold value it will pass but it’s wrong therefore we summed up both added product and cart quantity
Line 26: fetching a particular product’s data in the cart using the cart instance method get_cart_item using the cart item key which we get by passing the variable $cart_id
Line 27: the variable $cart_item holds an array which has all the details of a particular product in the cart, we fetching the product’s cart quantity $cart_item['quantity'] and sum with the add to cart quantity finally assign the total sum to the variable $quantity
Line 30: conditional check to check whether we crossed the threshold quantity if so then return true
Line 36: if the conditions are fails then return false to indicate threshold is either not reached or not applicable for this product
Conclusion
In this tutorial, you learned how to control the quantity of the products in the cart
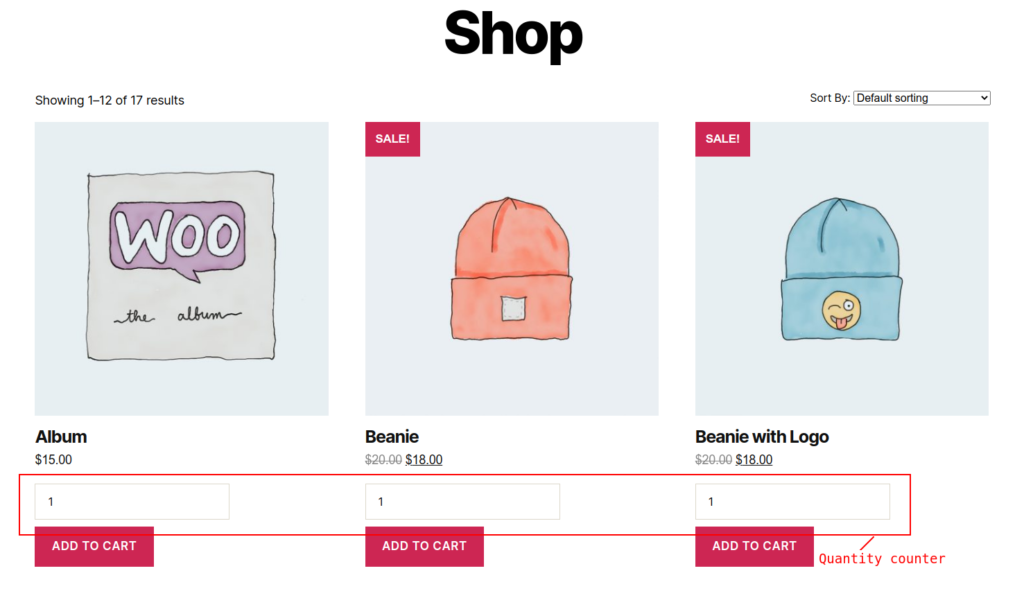
This tutorial will teach you how to add a quantity input text box with the number type for each product in the shop page
Something like this
When a user clicks the add to cart ajax button instead of adding one quantity of the product it will add the quantity present in the input box to the cart part page
Rendering Input Quantity Box
To render the quantity input box we are using the filter woocommerce_loop_add_to_cart_link
You can find the official WooCommerce source code in GitHub where the filter hook is created
Here is the code snippet for rendering the quantity box just above the add to cart button
Lets we see line by line what this little function doing
Line 1: hooking our quantity input rendering function to the filter hook with default priority 10 and the last argument passed for the function add_filter is about how many arguments the filter expects
Line 3: here we declared our filter hook function with woocommerce_loop_add_to_cart_link expected two arguments $html and $product
The $html argument holds the HTML of the ajax add to cart button
The $product argument holds the product’s WooCommerce PHP object of any one of the following WC_Product_Simple or WC_Product_Variable or WC_Product_Grouped or WC_Product_External
Line 6: we do a short circuit conditional check and add input quantity to only satisfying products
Let’s explore each condition
The first condition is $product which just check the variable’s value if it’s null or false or zero or empty string then discard the inner block of the if condition
The second condition is $product->is_type('simple') which checks the current iterated product is of a type simple
The third condition is $product->is_purchasable() which checks whether the product is a purchasable one
The fourth condition is $product->is_in_stock() which checks whether the product is available in the stock
The fifth condition is !$product->is_sold_individually() which checks negation of whether the product is sold individually without any quantities
If all the above-mentioned condition is true then quantity input is rendered as in Line 7 using the WooCommerce template function woocommerce_quantity_input(array(), $product)
This template function woocommerce_quantity_input accepts three optional parameters
The first parameter is arguments for the HTML input number we pass an empty array so use the default values
The second parameter accepts either WC_Product object or null, the default value is null
If the second parameter is null then it fetches the product object from the $GLOBALS array but here we passed looped product object variable $product even though it’s not necessary to pass because the filter woocommerce_loop_add_to_cart_link assigns the current product to the $GLOBALS array
The third boolean parameter by default accepts true, if true it echoes the HTML else return the HTML
Line 7: declared a JS variable simpleProductInput and assigned a DOM node list which we fetched using the JS method querySelectorAll of the document object
Let us explore the string parameter '.product-type-simple .quantity > input' passed to the method querySelectorAll
The method querySelectorAll behaves just like CSS selector so whatever DOM matched to the argument passed to the method is fetched as JS node list
.product-type-simple is the class selector which fetches the DOM element which has the class product-type-simple
If we further extend our selector like .product-type-simple .quantity which fetches the element matches with class value quantity and present inside the element with the class value product-type-simple
The angle bracket > denotes child combinator selector which means it selects only direct children element
input selects the dom element with HTML tag input
So what our selector .product-type-simple .quantity > input is doing?
It selects the input DOM present in each simple product
Line 9: loop and fetch every targeted dom node from the dom node list
Line 10: the method dom.addEventListener accepts two parameters
The first one is to bind/add an event input it’s just like the events click, change, etc. to each input tag and the second parameter is listener anonymous function
Let’s see the inner working of the anonymous function which accepts a single argument Event object e
Inside the anonymous function, we chained a sequence of methods which is called as method chaining
e.target property points to DOM object which triggers the current event here it is the quantity input box
e.target.parentElement returns the parent element of the target which is HTML div rendered over the quantity input tag
e.target.parentElement.nextElementSibling returns the next element which sibling to the targeted DOM
Closely note here we used nextElementSibling instead of nextSibling because the nextSibling fetches immediate next node it may be an element node or text node or comment node but nextElementSibling fetches the element node like P, Div, Span, etc. here we fetch anchor tag of the add to cart button
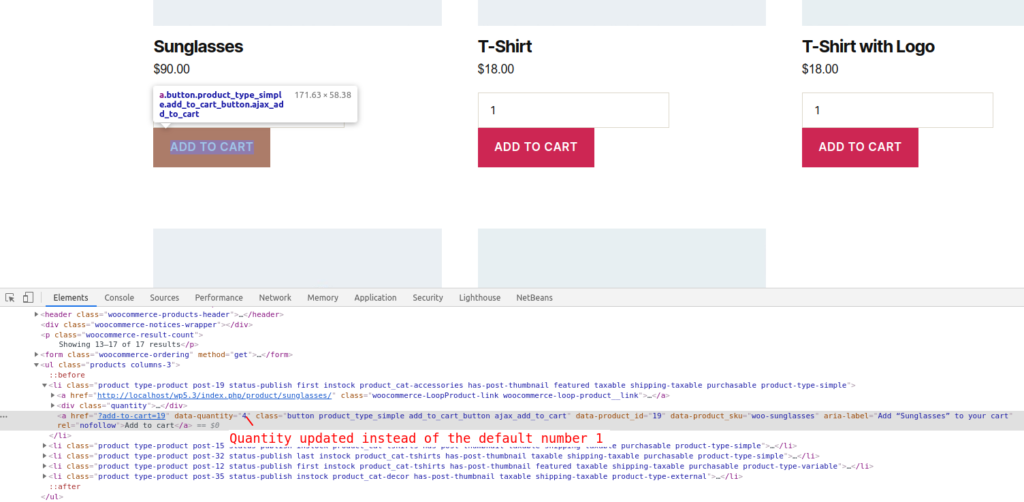
Finally, we set the quantity what present in the input tag to the anchor tag add to cart button data attribute using the method setAttribute('data-quantity', e.target.value)
Which accepts two parameters, the first one is the name of the attribute data-quantity and the second one is the value assigned to that attribute
Here the value is quantity input’s value because it is the target of the current event
That’s all finally we enclose the script and function
Conclusion
In this tutorial, you learned how to intercept the shop page’s product loop and insert our desired logic or HTML
Learned about types of product object such as WC_Product_Simple, WC_Product_Variable, WC_Product_Grouped and WC_Product_External
Learned about product object methods such as is_type, is_purchasable, is_in_stock and is_sold_individually
Learned about woocommerce_quantity_input which return or echo HTML of the quantity input
Learned about Javascript event, method chaining, CSS selector and update or override the HTML attributes
We implemented the functionality to add desired quantity instead of adding a single quantity in the cart
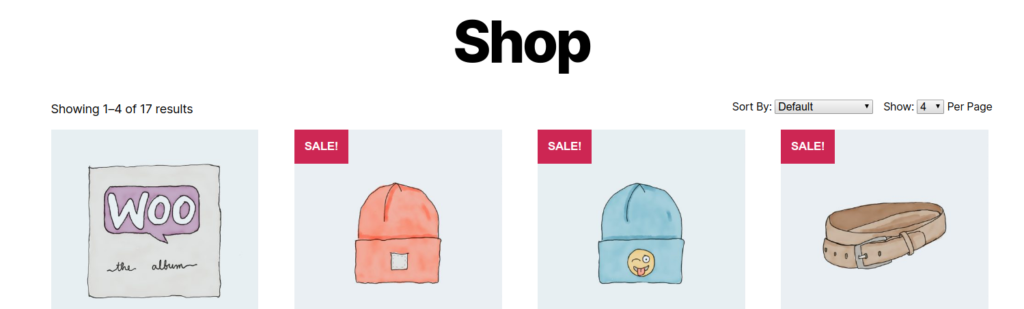
In this tutorial, you will learn to add dropdown which controls maximum how many products to show on a page.
This tutorial is the continuation of custom sorting tutorial
We will add a dropdown with selection options 4, 8, 16, 32 and All to control our products per page logic
We will add our code logic to our existing plugin repository in GitHub in a new branch v2
For your easy understanding of the logic lets, we see each and individual method with its filter separately in it’s each section instead of skimming the code from top to bottom
Lets we examine each part individually to understand the logic crystal clear
Explanation: Adding query string variables
Here we will explore the snippet of the method add_query_vars_products_per_page from our plugin class VG_Sort which add our query variable show to the query variable array
Direct link to the method in code repository branch v2
This method accepts a single parameter $vars on line 8 (line 8 is relative to the snippet, not the full code in repository this applicable to the upcoming explanations too) which holds all the publicly allowed query variables
On line 9 we added our query variable show which accepts the number of products to show per page
Once our query variable string also appended to the existing query vars array we return the variable $vars
This whole method is a callback method which attached to the filter query_vars please check the line number 15 for better understanding
Now we can use the query var show in our code we will see that in the next section
Explanation: Method controls product per page
Here we will explore the snippet of the method custom_products_per_page of the plugin class VG_Sort this method is core logic which controls the number of products to show per page
Direct link to the method in code repository branch v2
This method accepts a single parameter $per_page which accepts integer value by default WooCommerce assigns 16
The shop page more technically we can say product archive page which shows 16 products per page
Now we will change this argument variable $per_page value to see how this affect the number of products showing on a page
On line 10 we are using the WordPress helper function get_query_var which is used to fetch variable for WP_Query class we already appended our variable show we can use that in the query string
The function get_query_var holds the two arguments the first one is query string variable’s name the second one is the default value if the query string show is not added in the URL
From line 13 to 24 we used the switch case which handles how many products to show
Inside the switch statement if the variable $count matches with any case statement for example if it is matched with 8 then $per_page assigned with the value stored in variable $count
If the $count not matched with the any of the case statement then default value of 16 will be assigned to variable $per_page
At last, we return the variable $per_page
Once you attached this callback method to the filter loop_shop_per_page, you can test this functionality by passing query string like http://example.com/shop/?show=4 to your shop page directly
Explanation: Template For Product Per Page Dropdown
In the previous section, we implemented core logic behind the number of products to show in a page and we tested it by passing value for the query string show
Lets we see the method template_products_per_page of the class VG_Sort
Direct link to the method in code repository branch v2
On line 9 we call the method wc_get_template which is responsible for rendering the dropdown for products per page logic
This method first parameter is template name, in the method we used products-per-page.php
The second parameter is an optional array parameter where we can pass any value to our template by passing an associative array
The third parameter is denoting the template path
The fourth parameter is where we pass the path for our template which points to the directory templates which is present inside the plugin directory itself
The function plugin_dir_path identifies the plugin directory by accepting the file name here we use PHP magic constant __FILE__ which returns the file name with the full path
We append the string templates/ to the plugin_dir_path returned string which is point to the directory present inside our plugin root path
On line 12 we hooked our method to action function woocommerce_before_shop_loop which call our render method template_products_per_page before products rendering
On that time, our HTML content present in the path plugin-root/templates/products-per-page.php will be outputted on the archive page
Explanation: Dropdown HTML
In the previous section, we saw how our template is outputting, now we will see the HTML part of that rendered template plugin-root/templates/products-per-page.php
Direct link to the template in code repository branch v2
The HTML is straight forward so will explain important aspects only instead of explaining like what is form, label, etc
On line 7 for our form, we added our class vg-sort-show to the class attribute
On line 9 for the select tag, we added the attribute onchange with the value this.form.submit() which triggers the form submission when we change the value for e.g. from 4 to 16 it will trigger the form submission
In every option tag, we called the WordPress function selected which accepts three parameters and outputs selected="selected" attribute
The first parameter holds the first value to compare
The second parameter holds the second value to compare (which is optional)
The third parameter is control whether to echo the selected attribute or not (which is optional)
On line 17 the function wc_query_string_form_fields (official documentation) is used to outputs hidden form inputs for each query string variable
Explanation: Dropdown CSS Enqueuing
We are reached the final section of this tutorial this part is responsible for styling and positioning our products per page dropdown
Direct link to the method in code repository branch v2
Lets we explore the method add_assets of the plugin class VG_Sort
On line 9 we imported our CSS main.css which is located in plugin-root/assets/css/main.css using WordPress function wp_enqueue_style the first parameter is handle name it should be unique and the second parameter is CSS file’s URL
plugin_dir_url is similar to plugin_dir_path but it returns URL instead of filesystem directory path which is appended to our CSS file
This callback method is hooked to the action wp_enqueue_scripts on line 12 which is responsible for register and enqueue our asset file in the rendered HTML page
Explanation: Dropdown CSS File
The CSS file is located in the path plugin-root/asset/css/main.css
Direct link to the CSS file in code repository branch v2
On line 1 we are applying our CSS to form class vg-sort-show
On line 2 we provided rule float: right to move our form towards the right end of the parent element
On line 3 we applying o to both top and right margin 1rem to bottom to align parallel to the sort dropdown and to provide spacing between this and sort dropdown added 1.5rem to margin left
On line 4 applied padding 0.75rem to top and bottom then 0 for left and right
For CSS I referred CSS class woocommerce-ordering of official WooCommerce layout CSS (just inspect the default sort by dropdown form and apply whatever CSS opt for you by referring that)
Conclusion
You learned totally new concept when compared to previous tutorial, instead of altering existing one you added something brand new product per page dropdown
Learned to create new HTML template and render it on the fly with help of a hook function
In this tutorial you will learn how to add custom sorting for the product archive page
Renaming the existing sorting option
Re-ordering the option in sort dropdown
Overriding sorting form template and add meaningful title for the sorting dropdown
Quick overview of how to create plugin (Yes, all our customisation are plugin based except adding title to the sorting dropdown)
Quick Overview Plugin Creation
Go to the following path wp-content/plugins in your WordPress Project
Create a new directory and name it like vg-woo-sort
For naming the plugin I follow the following convention either my initial or project initial hyphen plugin name
Inside the directory vg-woo-sort create a new PHP file vg-woo-sort.php
Once you created the file, for security purpose add this line first which blocks the direct access to our script
Then add few plugin headers (Plugin Name is must)
Finally go to your Plugins menu in WP Admin Panel you will find your new minimal plugin kindly activate it
Customise Sorting Dropdown
WordPress plugin functionalities can be developed either by procedural or object oriented
Our plugin is developed through object oriented even though it’s simple
Our plugin class VG_Sort has two callback method custom_woocommerce_get_catalog_ordering_args and custom_woocommerce_catalog_orderby
Lets we see each method’s inner working in its individual section
Plugin & Template Full Code
You can find the full code for both plugin and template code in github
The plugin’s core code
The template’s core code
Explanation: Ordering Method
Here we will explore the snippet of the method custom_woocommerce_get_catalog_ordering_args from our plugin class VG_Sort
Here and in all explanation sections the line number denotes each individual snippet’s line number not the full code section
In line no 7 our method accepts single argument $args which is associative array which represents the products sort ordering configs
For inspection purpose once you attached this method with the filter function add print statement print_r($args) next to line 7 and refresh your shop page
In your shop page at the top the argument $args array is printed
Here is the sample for the default sorting option Array ( [orderby] => menu_order title [order] => ASC [meta_key] => )
The first key orderby holds two sorting values
Firstly it sort with menu_order and then product’s title
menu_order which can be adjusted to each products in their backend product edit page
By changing the Menu order value for individual product which is under the container product data you will find set of tabs, in that tabs click the Advanced tab
By changing the number from 0 to any number positive value which push the product to last and negative value will pull the product to the first
If, for more than one product the Menu order is same then it will sort by title
The key order is used to arrange the products either in ascending or descending
The key meta_key is used to sort the product based on some custom key
In line 8 we assign $orderby_value variable by checking the get query string parameter if it’s set then we sanitise it using WP sanitise function wc_clean else assign it from option using WP function get_option which retrieves an option value for the passed option name
The line between 13 and 19 is the core logic to create new sort order for the product archive page
In both conditional statement we compare the get parameter value with the desired order by string and alter the $args parameter (for $args key-value we already discussed in 5th point please refer that if you need to explore more)
Finally in our callback method we return the variable $args
Explanation: Rename & Reorder Method
Here we will explore the snippet of the method custom_woocommerce_catalog_orderby from our plugin class VG_Sort which is used for renaming & reordering
We assume that you attached/hooked this method to the filter function woocommerce_default_catalog_orderby_options and woocommerce_catalog_orderby then only whatever you print and check will work
This method’s main functionality is renaming and reordering the sort dropdown to do that first we need to know the selection option’s name and its display value
So kindly add print statement print_r($sortby) next to the line 2 i.e. after the method definition and refresh the product archive page to check the argument array’s key-value
It will print the array like this Array ( [menu_order] => Default sorting [popularity] => Sort by popularity [rating] => Sort by average rating [date] => Sort by latest [price] => Sort by price: low to high [price-desc] => Sort by price: high to low ) just above the sort order dropdown
As you clearly noted the key, you came to know that now we will override this array’s value also we reorder the key
We override it from the line 3 to 12
If you don’t need any one of the ordering for example if you don’t need default order [menu_order] => Default sorting then remove that key value from the array
We renamed each sort order by overriding the value like from Sort by average rating to Average rating
Our new array constitutes our new sorting key-value too to display option to sort the product alphabetical or reverse alphabetical
Finally we return the variable $sortby
Explanation: Callback’s Filter
We used totally three filters namely woocommerce_get_catalog_ordering_args, woocommerce_default_catalog_orderby_options and woocommerce_catalog_orderby
woocommerce_get_catalog_ordering_args is the filter action deal with sorting operation
Our custom template constitutes a minimal change to clone of core template we will see detailed explanation
While exploring the filter action woocommerce_default_catalog_orderby in official documentation which is present inside the function woocommerce_catalog_ordering
As you skim down to the end of the function you will find at the last it calls the function wc_get_template with the first parameter as loop/orderby.php
Based on our analysis we have to override the partial or sub template orderby.php which located inside the directory loop of the WooCommerce plugin templates directory (To understand the overriding concept read the article about template overriding)
We copied the loop/orderby.php into our current theme in the following path woocommerce/loop/orderby.php
Now we can start rewrite the HTML in our newly copied template orderby.php
We enclosed our select tag inside the label tag and prefixed the select with the string value Sort By: (as you see now there is no repetition of sort by string inside the option)
Conclusion
You learned to add new sorting to your existing product archive page
To modify the existing sort option
To modify the template which render the sort order select option
Now you have a clear understanding about sort order dropdown
We covered all the logic and modification related to the sort order dropdown now you are solid to modify in and around of products sort order