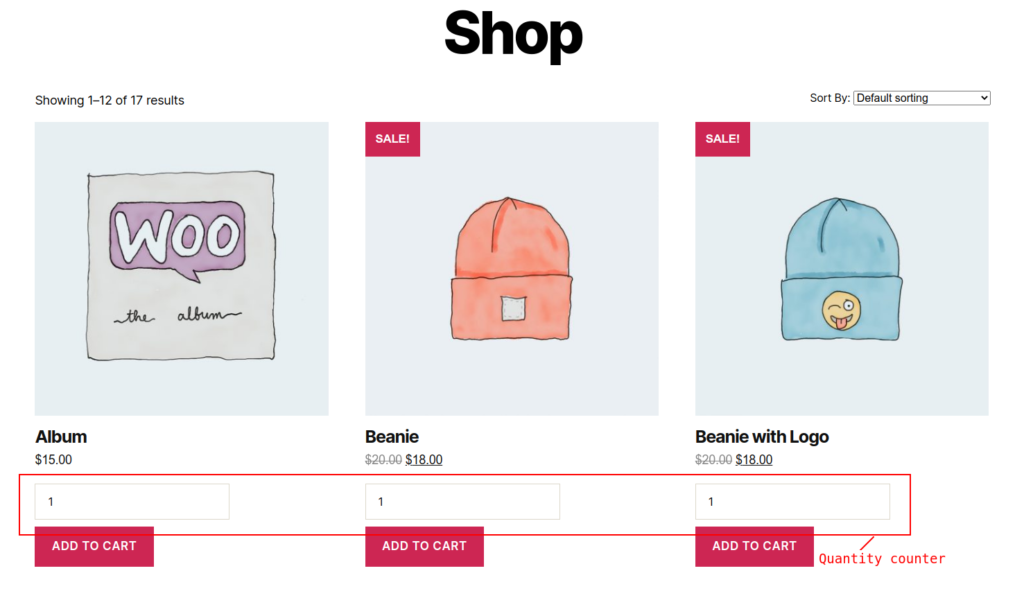
This tutorial will teach you how to add a quantity input text box with the number type for each product in the shop page
Something like this
When a user clicks the add to cart ajax button instead of adding one quantity of the product it will add the quantity present in the input box to the cart part page
Rendering Input Quantity Box
To render the quantity input box we are using the filter woocommerce_loop_add_to_cart_link
You can find the official WooCommerce source code in GitHub where the filter hook is created
Here is the code snippet for rendering the quantity box just above the add to cart button
Lets we see line by line what this little function doing
Line 1: hooking our quantity input rendering function to the filter hook with default priority 10 and the last argument passed for the function add_filter is about how many arguments the filter expects
Line 3: here we declared our filter hook function with woocommerce_loop_add_to_cart_link expected two arguments $html and $product
The $html argument holds the HTML of the ajax add to cart button
The $product argument holds the product’s WooCommerce PHP object of any one of the following WC_Product_Simple or WC_Product_Variable or WC_Product_Grouped or WC_Product_External
Line 6: we do a short circuit conditional check and add input quantity to only satisfying products
Let’s explore each condition
The first condition is $product which just check the variable’s value if it’s null or false or zero or empty string then discard the inner block of the if condition
The second condition is $product->is_type('simple') which checks the current iterated product is of a type simple
The third condition is $product->is_purchasable() which checks whether the product is a purchasable one
The fourth condition is $product->is_in_stock() which checks whether the product is available in the stock
The fifth condition is !$product->is_sold_individually() which checks negation of whether the product is sold individually without any quantities
If all the above-mentioned condition is true then quantity input is rendered as in Line 7 using the WooCommerce template function woocommerce_quantity_input(array(), $product)
This template function woocommerce_quantity_input accepts three optional parameters
The first parameter is arguments for the HTML input number we pass an empty array so use the default values
The second parameter accepts either WC_Product object or null, the default value is null
If the second parameter is null then it fetches the product object from the $GLOBALS array but here we passed looped product object variable $product even though it’s not necessary to pass because the filter woocommerce_loop_add_to_cart_link assigns the current product to the $GLOBALS array
The third boolean parameter by default accepts true, if true it echoes the HTML else return the HTML
Line 7: declared a JS variable simpleProductInput and assigned a DOM node list which we fetched using the JS method querySelectorAll of the document object
Let us explore the string parameter '.product-type-simple .quantity > input' passed to the method querySelectorAll
The method querySelectorAll behaves just like CSS selector so whatever DOM matched to the argument passed to the method is fetched as JS node list
.product-type-simple is the class selector which fetches the DOM element which has the class product-type-simple
If we further extend our selector like .product-type-simple .quantity which fetches the element matches with class value quantity and present inside the element with the class value product-type-simple
The angle bracket > denotes child combinator selector which means it selects only direct children element
input selects the dom element with HTML tag input
So what our selector .product-type-simple .quantity > input is doing?
It selects the input DOM present in each simple product
Line 9: loop and fetch every targeted dom node from the dom node list
Line 10: the method dom.addEventListener accepts two parameters
The first one is to bind/add an event input it’s just like the events click, change, etc. to each input tag and the second parameter is listener anonymous function
Let’s see the inner working of the anonymous function which accepts a single argument Event object e
Inside the anonymous function, we chained a sequence of methods which is called as method chaining
e.target property points to DOM object which triggers the current event here it is the quantity input box
e.target.parentElement returns the parent element of the target which is HTML div rendered over the quantity input tag
e.target.parentElement.nextElementSibling returns the next element which sibling to the targeted DOM
Closely note here we used nextElementSibling instead of nextSibling because the nextSibling fetches immediate next node it may be an element node or text node or comment node but nextElementSibling fetches the element node like P, Div, Span, etc. here we fetch anchor tag of the add to cart button
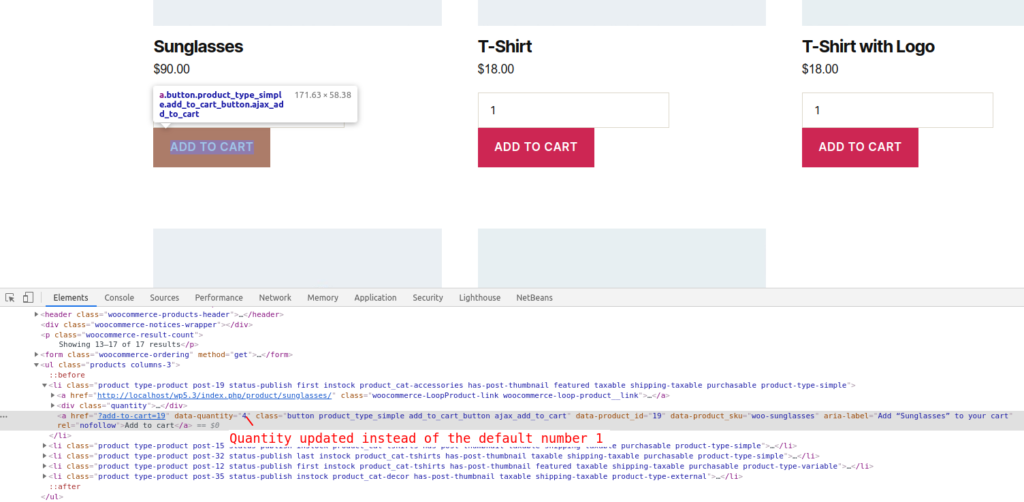
Finally, we set the quantity what present in the input tag to the anchor tag add to cart button data attribute using the method setAttribute('data-quantity', e.target.value)
Which accepts two parameters, the first one is the name of the attribute data-quantity and the second one is the value assigned to that attribute
Here the value is quantity input’s value because it is the target of the current event
That’s all finally we enclose the script and function
Conclusion
In this tutorial, you learned how to intercept the shop page’s product loop and insert our desired logic or HTML
Learned about types of product object such as WC_Product_Simple, WC_Product_Variable, WC_Product_Grouped and WC_Product_External
Learned about product object methods such as is_type, is_purchasable, is_in_stock and is_sold_individually
Learned about woocommerce_quantity_input which return or echo HTML of the quantity input
Learned about Javascript event, method chaining, CSS selector and update or override the HTML attributes
We implemented the functionality to add desired quantity instead of adding a single quantity in the cart
I am sure this paragraph has touched all the internet users,
its really really fastidious post on building up new blog.
I’ll immediately clutch your rss feed as I can not in finding your e-mail subscription hyperlink or e-newsletter
service. Do you’ve any? Please let me know in order that I could subscribe.
Thanks. Greetings from Los angeles! I’m bored to tears at work
so I decided to check out your website on my
iphone during lunch break. I enjoy the information you present
here and can’t wait to take a look when I get home.
I’m amazed at how quick your blog loaded on my cell phone ..
I’m not even using WIFI, just 3G .. Anyways,
superb site! http://cars.com
Thanks for your interest in my blogging. There is no newsletter subscription intentionally developed my website as minimal as possible with security in mind. Thank you for your appreciation. I always post a topic/month. I hope I’m not bored you by filling your mind full of programming thingy!!!
Comments
2 responses to “How To Add Quantity Input In Shop Page”
I am sure this paragraph has touched all the internet users,
its really really fastidious post on building up new blog.
I’ll immediately clutch your rss feed as I can not in finding your e-mail subscription hyperlink or e-newsletter
service. Do you’ve any? Please let me know in order that I could subscribe.
Thanks. Greetings from Los angeles! I’m bored to tears at work
so I decided to check out your website on my
iphone during lunch break. I enjoy the information you present
here and can’t wait to take a look when I get home.
I’m amazed at how quick your blog loaded on my cell phone ..
I’m not even using WIFI, just 3G .. Anyways,
superb site! http://cars.com
Also visit my web page :: Jack
Jack,
Thanks for your interest in my blogging. There is no newsletter subscription intentionally developed my website as minimal as possible with security in mind. Thank you for your appreciation. I always post a topic/month. I hope I’m not bored you by filling your mind full of programming thingy!!!
Here is the RSS feed: https://www.vijayan.in/feed/