Most of the time when we execute a permission required command but we forget to add sudo at the start of the command then terminal throws the error permission denied
So what we will do enter up arrow (navigation key) and enter home or continuously press left arrow key to go to the initial position of the previously executed command
In command at the start position we will start type sudo
Instead of that we have an alternative to avoid navigating towards start of your command
New Procedure
Now we are going to see how to execute the permission denied command alternative and fast way
In your terminal type sudo !!
In terminal, you will see previously failed command is executing with superuser permission
In past days replicating the development environment of one machine to another is difficult
We can’t assure each system is exact clone of other system
But by using Devilbox we can create a highly customisable dockerized LAMP stack
No need worry about operating systems if all system have identical .env file then all system work similarly
One of the use case is it will provide identical environment which help developers in different territory can maintain their stack identical
When a new project arrive we can handle the requirement analysis, delivery date, estimate over all cost, task assigning to team, etc
But to setup all developers system identical to dev environment is time consuming process
So this tedious work of configuring all system identical can be easy with the help of Devilbox
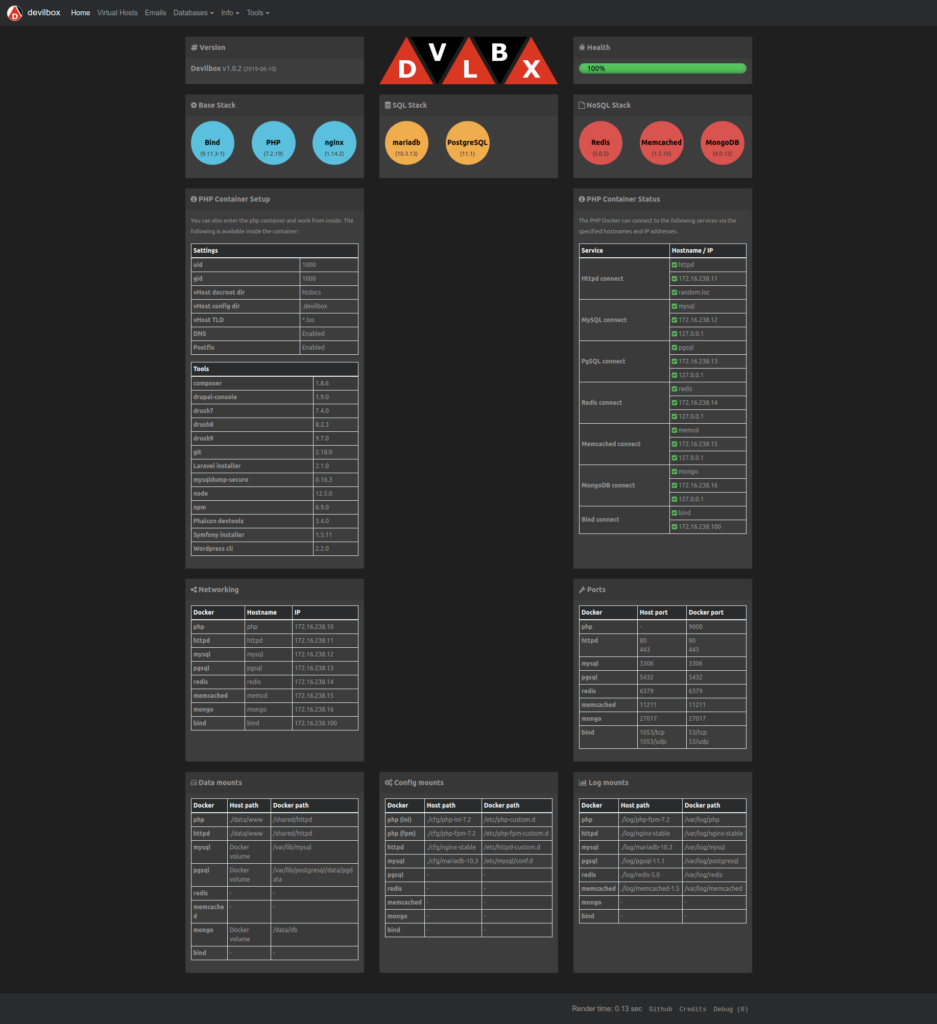
Devilbox services
Using Devilbox you are compartmentalizing your code and all other services (stacks) for each specific project
So you can do all projects with different configuration under one Devilbox
We can share the container to other developer also this eradicate the fallacy “it works on my machine” or “Check your system have all required configuration”
Devilbox supports various services like webserver, Relational database, caching, NoSQL with PHP version 5.2 to 7.3
As you noted all the services are available in various version we can debug or refactor our code very quickly. For e.g. if you are planned to upgrade our source code from PHP 5 to PHP 7 and MySQL 5 to MySQL 8 version. You can switch in lesser time
Installation & Configuration
Lets see how to use Devilbox in our linux system
Do git clone of Devilbox repository using the command git clone https://github.com/cytopia/devilbox
The above command will download the code necessary to run the Devilbox
Once downloaded change directory to devilbox using shell command cd devilbox/
Inside the directory sample configuration text file is present in the name env-example
Copy that file to .env new file using the command cp env-example .env
Once copied .env, edit it using any editor (I’m using vim. Shell command: vim .env)
In .env file, under the section 1. Choose Images (Version) you will find various version of all services
In section 1.1, lots of PHP versions are there with one version uncommented (The line which don’t start with # is said to be uncommented line and line which starts with # is said to be commented line. So the line which are started with # will be neglected by docker which we will see in upcoming points)
If you need you can change all service layers for example instead of default HTTPD server nginx you can choose apache likewise for database instead of default mariadb can choose mysql or percona or postgres
Lets Compose
Once you configured .env then run the command sudo docker-compose up in terminal (command prompt or shell as root user to avoid permission error)
Wait for a minute once the above command run. You may get error like this
devilbox_bind_1 is up-to-date
Starting devilbox_php_1 ... done
Starting devilbox_httpd_1 ... error

ERROR: for devilbox_httpd_1  Cannot start service httpd: driver failed programming external connectivity on endpoint devilbox_httpd_1 (c7f5ee7c935d4d8789c20a965efcb9697b277f761fcd98472e7d24c254b5433f): Error starting userland proxy: listen tcp 0.0.0.0:80: bind: address already in use

ERROR: for httpd  Cannot start service httpd: driver failed programming external connectivity on endpoint devilbox_httpd_1 (c7f5ee7c935d4d8789c20a965efcb9697b277f761fcd98472e7d24c254b5433f): Error starting userland proxy: listen tcp 0.0.0.0:80: bind: address already in use
ERROR: Encountered errors while bringing up the project.
This error says already port 80 in use
Most probably this port is used by apache service apache2 in debian based distros or httpd in redhat based distros
So you can use the following command stop the http service sudo systemctl stop apache2
You can check the stopped apache status using command sudo systemctl status apache2
Once again run the command sudo docker-compose up
After running the command if you face the below error i.e. mysql can’t listen port 3306 then it is used by system’s other mysql service
ERROR: for mysql  Cannot start service mysql: driver failed programming
external connectivity on endpoint devilbox_mysql_1 (d449806d13ea474adc30293ef53e84d91cbae6f5feef7253dce69849c2d7b6e2):
Error starting userland proxy: listen tcp 0.0.0.0:3306: bind: address already in use
ERROR: Encountered errors while bringing up the project.
Run this command sudo systemctl stop mysql to stop already running mysql service
Once again run sudo docker-composer up after few minutes every services of docker will run properly
Tombstone is the dead code detection library for PHP
In our real life most of the time we use only 20 percentage of any application frequently
So using Tombstone library (GitHub link: scheb/tombstone) we will check how to remove zero times or rarely called functions
As a result our codebase will get slimmer and healthier by removing unwanted functions
Leaving dead code in project makes it much harder to find the bugs
Using IDE’s find usage we can easily identify whether the function is called or not
But if function a() called inside function b() which is called inside function c() and function c() is nowhere used it’s difficult to identify these kind of issues
So for these kind of issue, dead code deduction library will be used as handy tool
Tombstoning is a basic step by placing a marker code inside our code block where you think the code is dead
Once you placed the marker code wait for a while and allow users to use your application
After that you will get a log of all called functions so these called functions are still in use
Hope you understand the theory part of how tombstoning process works
Lets we see it in practical way by using the library scheb/tombstone
First import vendor package scheb/tombstone in your codebase using composer
Create the tombstone helper as like the given below gist if you have doubt please refer the sample github toy project linked at the last
The class Tombstone helper has three main components public property $logPath to assign the log path, constructor which is used to add the stream handling for our log file and finally we created a public method tombstone() to do the tombstoning process
We created helper and now we are going to use tombstone method in our code.
Please refer the given below gist
Here in class DeadCode we have two method called() and notCalled() with tombstone marker
As you noted in our tombstone marker method we passed two arguments first one is marker created date and second one is who created the marker
We call our DeadCode::called() method but not the DeadCode::notCalled() (don’t panic we didn’t print anything so the index.php page is remain blank)
So after few times of execution of index page and when we see our log we found that DeadCode class method notCalled() wasn’t logged
The log is appended in tombstones.log file you can easily parse what each line of log says: when the log was logged with tombstone date and who called in which file at which line number in which function and in which function it was invoked
So the method DeadCode::notCalled() is the safe candidate to remove from our code because that method is called nowhere
Please find the simple sample for dead code detection (GitHub link: deadcode detection)
The above one line shell snippet in php script is used to convert the powerpoint file in to PDF file using libreoffice. The same command can be used for all the files which are able to open using libreoffice like doc, docx, odt, odp, etc., Shell command is enclosed in back tick symbol not single quotes. PHP by default execute command inside back tick as shell command alternatively you can use shell_exec
Let’s we see each arguments and it’s description (this is an excerpt from official document) we passed to the shell command libreoffice
--headless Starts in “headless mode” which allows using the application without GUI. This special mode can be used when the application is controlled by external clients via the API.
--invisible Starts in invisible mode. Neither the start-up logo nor the initial program window will be visible. Application can be controlled, and documents and dialogs can be controlled and opened via the API. Using the parameter, the process can only be ended using the taskmanager (Windows) or the kill command (UNIX-like systems). It cannot be used in conjunction with –quickstart.
--convert-to OutputFileExtension[:OutputFilterName] \ [--outdir output_dir] [--convert-images-to] Batch convert files (implies –headless). If –outdir isn’t specified, then current working directory is used as output_dir. If –convert-images-to is given, its parameter is taken as the target filter format for *all* images written to the output format. If –convert-to is used more than once, the last value of OutputFileExtension [:OutputFilterName] is effective. If –outdir is used more than once, only its last value is effective. For example: --convert-to pdf *.odt --convert-to epub *.doc --convert-to pdf:writer_pdf_Export --outdir /home/user *.doc --convert-to "html:XHTML Writer File:UTF8" \ --convert-images-to "jpg" *.doc
Finally we pass shell command textual output to virtual device /dev/null using > symbol in linux based distros whatever it receives as input it will discard it. As a result there won’t be displaying of any message when you using this snippet inside your custom function or method.
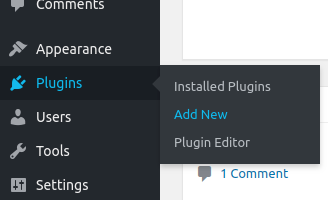
In left menu hover over Plugins menu. In sub-menu click Add New
Once you clicked Add New sub-menu it will be redirected to Add Plugins page.
In the Add Plugins page’s search field enter the keyword as woocommerce.
For reference please see below image at the top right corner (which is highlighted in red stroke/border) there is search field
In the grid of cards click the install button (highlighted in red stroke/border) in the WooCommerce card which is at the position 1 in the attached image
Once you installed successfully click the Activate button (for reference please see the below image with highlighted stroke/border)
After the successful activation of WooCommerce it will redirect to setup wizard these steps are optional either you can skip now by clicking the link “Not right now” or fill it
Click the Let’s go! button (refer 4th point you will find button at the last)
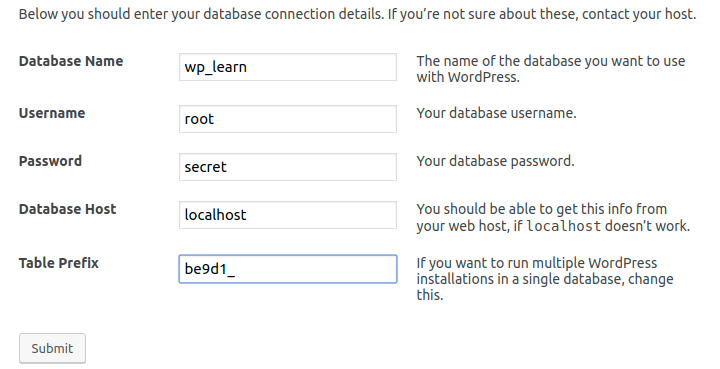
You will be redirected to the following screen
By seeing the image itself you will get a clear idea what to enter
If you are closely noted the table prefix is replaced from default wp to random string for the security purpose
Though this random string table prefix is simple one this will be the first step to add a security to your site
Sometimes if you don’t have a proper permission in your Linux server you will face the following error
Run this shell command with apache’s user/group
In Ubuntu the shell command is sudo chown -R www-data:www-data /var/www
After executed the shell command chown refresh the installation screen in your website then the screen will be similar to the following image
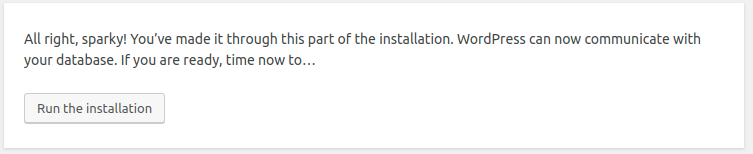
Once you clicked the button Run the installation the following screen will appear
Click the Install WordPress button it will install the WP and you will be redirected to the following final screen
Once you click Log in you will be redirected admin login if you like do administration work enter your credential detail and get logged-in else enter your website URL you will be redirected to the home page