In past days replicating the development environment of one machine to another is difficult
We can’t assure each system is exact clone of other system
But by using Devilbox we can create a highly customisable dockerized LAMP stack
No need worry about operating systems if all system have identical .env file then all system work similarly
One of the use case is it will provide identical environment which help developers in different territory can maintain their stack identical
When a new project arrive we can handle the requirement analysis, delivery date, estimate over all cost, task assigning to team, etc
But to setup all developers system identical to dev environment is time consuming process
So this tedious work of configuring all system identical can be easy with the help of Devilbox
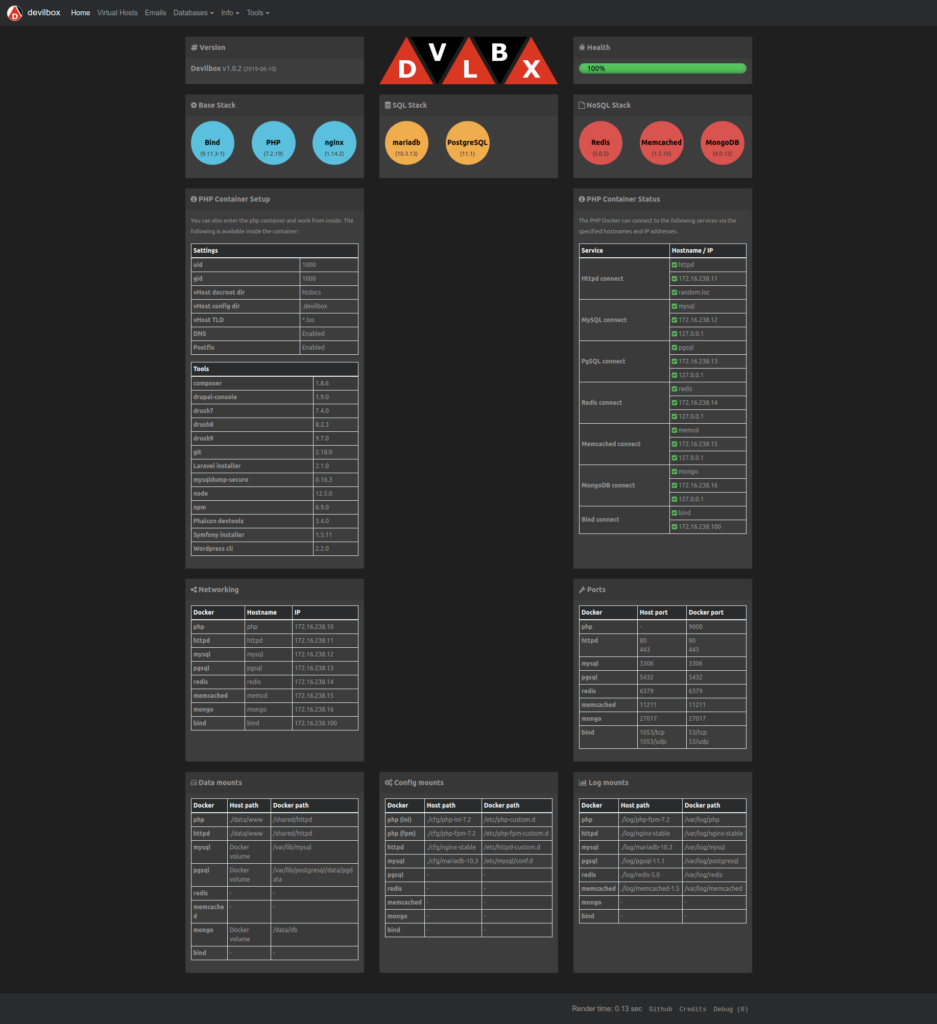
Devilbox services
Using Devilbox you are compartmentalizing your code and all other services (stacks) for each specific project
So you can do all projects with different configuration under one Devilbox
We can share the container to other developer also this eradicate the fallacy “it works on my machine” or “Check your system have all required configuration”
Devilbox supports various services like webserver, Relational database, caching, NoSQL with PHP version 5.2 to 7.3
As you noted all the services are available in various version we can debug or refactor our code very quickly. For e.g. if you are planned to upgrade our source code from PHP 5 to PHP 7 and MySQL 5 to MySQL 8 version. You can switch in lesser time
Installation & Configuration
Lets see how to use Devilbox in our linux system
Do git clone of Devilbox repository using the command git clone https://github.com/cytopia/devilbox
The above command will download the code necessary to run the Devilbox
Once downloaded change directory to devilbox using shell command cd devilbox/
Inside the directory sample configuration text file is present in the name env-example
Copy that file to .env new file using the command cp env-example .env
Once copied .env, edit it using any editor (I’m using vim. Shell command: vim .env)
In .env file, under the section 1. Choose Images (Version) you will find various version of all services
In section 1.1, lots of PHP versions are there with one version uncommented (The line which don’t start with # is said to be uncommented line and line which starts with # is said to be commented line. So the line which are started with # will be neglected by docker which we will see in upcoming points)
If you need you can change all service layers for example instead of default HTTPD server nginx you can choose apache likewise for database instead of default mariadb can choose mysql or percona or postgres
Lets Compose
Once you configured .env then run the command sudo docker-compose up in terminal (command prompt or shell as root user to avoid permission error)
Wait for a minute once the above command run. You may get error like this
devilbox_bind_1 is up-to-date
Starting devilbox_php_1 ... done
Starting devilbox_httpd_1 ... error

ERROR: for devilbox_httpd_1  Cannot start service httpd: driver failed programming external connectivity on endpoint devilbox_httpd_1 (c7f5ee7c935d4d8789c20a965efcb9697b277f761fcd98472e7d24c254b5433f): Error starting userland proxy: listen tcp 0.0.0.0:80: bind: address already in use

ERROR: for httpd  Cannot start service httpd: driver failed programming external connectivity on endpoint devilbox_httpd_1 (c7f5ee7c935d4d8789c20a965efcb9697b277f761fcd98472e7d24c254b5433f): Error starting userland proxy: listen tcp 0.0.0.0:80: bind: address already in use
ERROR: Encountered errors while bringing up the project.
This error says already port 80 in use
Most probably this port is used by apache service apache2 in debian based distros or httpd in redhat based distros
So you can use the following command stop the http service sudo systemctl stop apache2
You can check the stopped apache status using command sudo systemctl status apache2
Once again run the command sudo docker-compose up
After running the command if you face the below error i.e. mysql can’t listen port 3306 then it is used by system’s other mysql service
ERROR: for mysql  Cannot start service mysql: driver failed programming
external connectivity on endpoint devilbox_mysql_1 (d449806d13ea474adc30293ef53e84d91cbae6f5feef7253dce69849c2d7b6e2):
Error starting userland proxy: listen tcp 0.0.0.0:3306: bind: address already in use
ERROR: Encountered errors while bringing up the project.
Run this command sudo systemctl stop mysql to stop already running mysql service
Once again run sudo docker-composer up after few minutes every services of docker will run properly
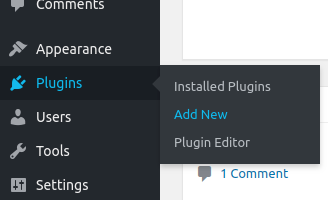
In left menu hover over Plugins menu. In sub-menu click Add New
Once you clicked Add New sub-menu it will be redirected to Add Plugins page.
In the Add Plugins page’s search field enter the keyword as woocommerce.
For reference please see below image at the top right corner (which is highlighted in red stroke/border) there is search field
In the grid of cards click the install button (highlighted in red stroke/border) in the WooCommerce card which is at the position 1 in the attached image
Once you installed successfully click the Activate button (for reference please see the below image with highlighted stroke/border)
After the successful activation of WooCommerce it will redirect to setup wizard these steps are optional either you can skip now by clicking the link “Not right now” or fill it
Click the Let’s go! button (refer 4th point you will find button at the last)
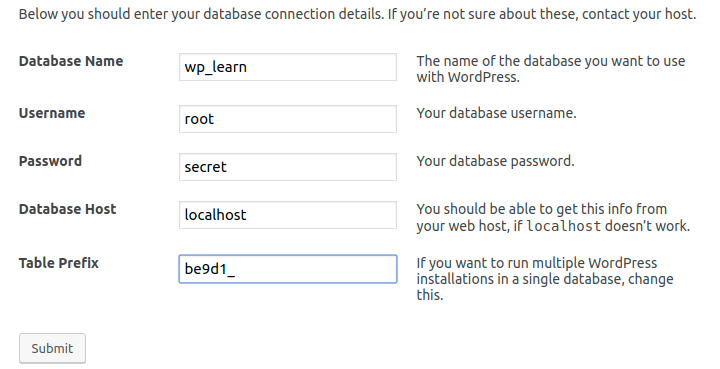
You will be redirected to the following screen
By seeing the image itself you will get a clear idea what to enter
If you are closely noted the table prefix is replaced from default wp to random string for the security purpose
Though this random string table prefix is simple one this will be the first step to add a security to your site
Sometimes if you don’t have a proper permission in your Linux server you will face the following error
Run this shell command with apache’s user/group
In Ubuntu the shell command is sudo chown -R www-data:www-data /var/www
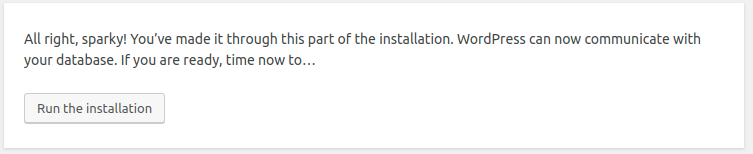
After executed the shell command chown refresh the installation screen in your website then the screen will be similar to the following image
Once you clicked the button Run the installation the following screen will appear
Click the Install WordPress button it will install the WP and you will be redirected to the following final screen
Once you click Log in you will be redirected admin login if you like do administration work enter your credential detail and get logged-in else enter your website URL you will be redirected to the home page