In this tutorial, you will learn how to add an admin table which is similar to admin posts or pages or comments table list
Our table list is a merged list of all searchable post types post which are in draft mode i.e. not yet published or still work in progress posts
Based on this tutorial you will learn how to implement the following features
Search box
Filter dropdown (Post type)
Bulk action (Trash multiple posts at a time)
Action quick links (Each post have edit, trash & view)
Pagination
Our custom table is a child class of the official table class: WP_List_Table
We will explore each and every method in its individual section
GitHub link to directly activate as a plugin while learn/play with the source
Sample Admin Table
Complete Source Code
Include Base Class
In the complete source code gist (from now onwards we call it as main gist/file), you can find that we included our base class at line no: 24 though most of the time the class Drafts_List_Table directly extend the class WP_List_Table without the include once but WordPress functioning based on hooking process so sometimes our class may be called before hooked and globally included the WP_List_Table therefore it’s always better to check if it’s included or not and included the class file
Also instead of hopping here and there, we can add the snippet which is related to the current context so we include partial code gist like this
Extend Base Class
We extend our table class Drafts_List_Table from core WordPress class WP_List_Table at line no: 35 like this
Class Constant & Property
The class Drafts_List_Table have one constant POSTS_PER_PAGE and one private property $allowed_post_types (main source code line no: 40)
The POSTS_PER_PAGE is to stores an integer value which is the number of maximum posts to be shown in the table per page
The property $allowed_post_types have an array of post types that can be queried and used to list out all posts that come under these post types
Constructor
Our constructor (main source code line no: 52) is not that much fancy it has two simple statement one is a parent constructor call with three arguments singular, plural both for labeling purpose and ajax accepts boolean to decide whether HTTP calls are ajax based or not
The other one calls the class method allowed_post_types() and stores the return value in the private property allowed_post_types
Get Allowed Post Types
This method is placed inside this class is for tutorial purpose only (but for the real-life project, my suggestion is to create a utility or helper module which may have more helper classes like one for UI works, another API services, and other for wrapping commonly used DB queries likewise we can build n-number of classes for different common purposes)
Let’s place the architectural suggestions aside and focus on this tutorial, the method allowed_post_types ( main source code line no: 71 ) will return the post types in the array
Line no 9: by using WP core function get_post_types we fetch the post types in our web application here we pass an argument public with the boolean value true therefore it returns only publicly accessible post types
Visit documentation for more details about the function get_post_types
We unset the attachment post type to exclude that kind of posts from the table list and finally returned the remaining post type as an array
Convert Slug String To Human Readable
Yes, this method (main source code line no: 85) also another good candidate for the utility method
This method converts the slug to readable format i.e. it replaces all underscore symbol with white space and title cased the words
Convert Post Types Human Readable
The method allowed_post_types_readable (main source code line no: 94) is iterate on all allowed post type and convert the post type’s slug into human-readable
The inner working of this method is using the PHP function array_map we pass our human_readable as a callback that applies on each value of the private array property allowed_post_types
The newly generated array is assigned to the variable $formatted and the same is returned
Create Custom WP_Query Object
This method get_posts_object (main source code line no: 108) is the data fetching method of this custom admin table class
As this method is a little lengthier let’s try to refer to each statement using its gist line number for easier understanding, here all the line numbers pointing to the gist get_posts_object.php
Line no 9: fetching private array property allowed_post_types then assign it to the method’s local variable $post_types
Line no 11: we declare a local variable $post_args which holds initial argument we pass to the WP_Query instance constructor call
The $post_args is an associative array with the following key-value pair
The key post_type holds the array of post types
The key post_status holds the array of statuses to fetch here we pass only one value i.e. draft
The key posts_per_page holds the integer value which controls how many posts to show on the page
Line no 17: the local variable $paged is fetch page number from query string by using the PHP function filter_input to validate if it’s an integer or not using the filter id FILTER_VALIDATE_INT
Line no 19: if the variable $paged having truth value then assign the value stored in $paged to $post_args array key paged
Line no 23: the local variable $post_type is fetching post type (which we can use to filter the table to show only specific post type posts only) from query string by using the PHP function filter_input, sanitized the incoming string using the id FILTER_SANITIZE_STRING
Line no 25: if the variable $post_type having truth value then assign the value stored in $post_type to $post_args array key post_type
Line no 29: the variable $orderby accepts the table column name, as the value get from the query string it’s good to sanitize it
WordPress provided a sanitize function sanitize_sql_orderby which is specifically deal with the order by clause with or without sort order
Using the sanitize_sql_orderby function we sanitized the column name
Line no 30: the filtered query string order’s value is passed to WordPress function esc_sql for escaping if any SQL injection character present
Don’t accept user’s data blankly always do escaping, sanitization, and validation (skip sub-points if you need)
Four years back got a chance to audit a project, the theme is adding a music file name and it’s CDN path to DB in the insert query without escaping or doing some other alternative like a prepared statement or PDO the source code inserts the file name
When sending back the review to the concerned team they asked “why we need to escape? it’s just a filename of an MP3 file”
I replied that we need to escape the filename because various bands have an apostrophe in their band name like Guns N' Roses therefore please escape the user input
Thank god the application is Indian based music and running happily without unintentional SQL injection by the web application user because most of the Indian name or band name doesn’t have an apostrophe
But the piece of advice is, in order to break your web application no need to hire a hacker just make it famous, and more user using it you will get to know why I’m insisting this
Line no 32: if the variable $orderby is empty then set a default value date, then our posts are sorted by the date column
Line no 36: if the variable $order is empty then set a default value desc, then our posts are sorted in descending order i.e. reverse chronological order
Line no 40: assigning the order by value into the variable $post_args associative index orderby which we pass an argument to the WP_Query class first parameter
Line no 41: this statement also similar to the previous one at line no 40
Line no 43: in the variable $search fetching the query string s and passed it to the esc_sql function, this query string s only available when the user did a search
Line no 44: as said in the previous point the s available only on search therefore before assigning we doing a conditional check to verify it’s not empty
Line no 45: once the not empty condition passed we assign the search value into the associative index s of the variable $post_args
Line no 48: finally we pass the $post_orgs to the class WP_Query and return the query class object
No Items Text Display
The method no_items is overridden method of the base class WP_List_Table
The purpose of this method is to display the information when no posts are available
Line no 7: displaying the message about no posts which properly escaped for HTML and can be translated by using the WordPress function esc_html_e
Display Default Column
Line no 10: the overridden method column_default is used to handle the column output
Internally this method is called for each column this method accepts two parameters
$item have all the current row’s columns values in associative key-value pair
$column_name current column name
Line no 11: declared and initialized the variable $result with empty string which we use to assign the column data to be shown
Line no 12: switch statement will switch and create the column value based on the passed column name
Line no 13: the date case is used to display date in two variant either by date if the post created date is more than one day else returns how human saying the date for e.g. 10 minutes ago
Line no 14: using the WordPress template function get_the_time retrieve the post created time with formatting, get_the_time to learn more
Line no 15: the function get_post_timestamp is used to retrieve the draft post published time in unix timestamp format, get_post_timestamp to learn more
Line no 16: took the seconds difference of current unix timestamp (using PHP function time) and post created time and assign it to the variable $time_diff
Line no 18: we’re checking the time is less than a day if so then display the time in human readable format using the WordPress formatting function human_time_diff
Line no 22: else will show the date in the format Y/m/d
The remaining cases ( author and type) are self explanatory
Line no 37: return the variable $result which have the value to show in the specific column
Display Table Header
The method get_columns ( main source code line no: 200 ) is an inherited must overridden method which is responsible for displaying the table headers
For a quick view please see the snippet of the main source below
This method simply returns the array of key-value pair of columns which have a set of an internal name as key and it’s display value as the value
Title Column Callback
The method column_title (main source code Line no: 216) is used to display the HTML in the table column Title
Internally this method is called by the parent method single_row_columnselseif is called the column_title method dynamically using the callback logic
Line no 10: using the WordPress function get_edit_post_link we fetch the edit link for the current post in the table row looping flow
Line no 14 – 36: is simple HTML generation to display in the Title column by returning the variable $output, in these statements, the only thing we need to focus on is a template function _post_states
The function _post_states is used to display post states as HTML for e.g. in the Introduction section if you see the sample image there are two things displayed in post states Draft, Elementor
The state Draft is fetched by core WordPress whereas Elementor fetched by Elementor plugin to notate this post is formed by Elementor page builder
Column Checkbox
The method column_cb (main source code line no: 251) is a simple method to display a checkbox in each row to select the post for bulk action like trashing an unneeded post
Build Table Data
The method prepare_items (main source code line no: 264) is the core part to create the data for the table note here I’m saying about an array of information to show on the table, not the HTML design part
Line no 9: called the method get_columns to fetch an array of column names to be shown in the header of the table
Line no 10: called the method get_sortable_columns to fetch an array of sortable data in the format of an internal name as key and sorting option as a value such as array( column_internal_name, sorting_type) and assign it to the variable $sortable (don’t worry we will see more detail when we explain this method we will see the detailed way)
Line no 13: the parent class property _column_headers accepts an array of arrays as in this order first array of columns to be shown in the table, second an array of columns which are hidden one, third array of sortable columns, fourth a string denote which column is primary one
Line no 16: called the method process_bulk_action which is responsible for bulk actions like trashing the posts
Line no 18: called the method get_posts_object which return the WP_Query instance with whatever filters and sorting options are applied, that instance is assigned to the variable $get_posts_obj
Line no 20: check if the queried WP_Query instance have posts object using the method $get_posts_obj->have_posts()
Line no 22: if posts are available then begin the looping while ( $get_posts_obj->have_posts() )
Line no 24: the WP_Query method the_post is used to retrieve the next post internally which sets WP_Query property in_the_loop to true and retrieves the next post
Line no 26: form the array of data therefore each index have an array of values to show in each row of the table, the formation of this array mostly using WordPress template functions
Line no 34: the function wp_reset_postdata is used to reset the global variable $post to the main query’s current post after completing our custom query loop
Line no 37: Assign our looped collection of table data to the parent class WP_List_Table property items therefore other methods that require data can access from this property
Line no 39: the parent class method set_pagination_args is responsible to set pagination related information to the parent class property _pagination_args here we basically set up our pagination using three items
total_items we pass the WP_Query property found_posts
per_page we pass the WP_Query property post_count
total_pages we pass the WP_Query property max_num_pages
Create Bulk Action Dropdown
This method (main source code line no: 309) return array of key-value pairs which is used to show in the bulk action dropdown (if you like to know how the HTML formed by retrieving the return value of this method then please check bulk_actions method of the parent class WP_List_Table)
Process Bulk Actions
This method process_bulk_action (main source code line no: 320) is used to do bulk actions like trashing the post likewise you can change the state of many posts (for e.g. change the set of posts from draft to publish) or process many posts data altogether (for e.g. trigger email to multi-selected users and change the custom state pending to invited)
Line no 9: in the conditional statement, we check whether the current action is trash if so then execute the inner block
Line no 10: the variable $post_ids hold get query value draft_id which is a collection of ids of the posts that need to be trashed
Line no 12: verify is the variable $post_ids is an array
Line no 13: convert all elements in the array into an integer value the reason is we received it from the get query therefore it will be a string and sometimes may have illegitimate data if the user intentionally add some junk data, here we iterated over each element using array_map
Line no 15: we check this in if condition to confirm at least one element present in the $post_ids array
The method display_tablenav (main source code LINE NO: 341) is an overridden method that is responsible for displaying bulk actions, filters dropdown, and pagination which accepts a single argument with a value of either top or bottom based on that display the block of HTML at the top or bottom of the table
Line no 12: created the navigation wrapper div with a dynamic class top or bottom based on the argument $which value
Line no 14: verify is the table has items to display
Line no 16: if has items then display the bulk action dropdown
Line no 20: the method extra_tablenav is used to display additional filter we will see more detail about this method in the next section
Line no 21: the method pagination is the parent class method that handles the pagination of the table
Extra Table Navigation HTML
The method extra_tablenav (main source code line no: 367) is used to display additional filter controls here using the argument $which we controlled our filter to display only at the top of the table
Line no 12: conditionally show our filter only at the top by checking the $which argument value is equal to top
Line no 13: create a multidimensional associative array $drafts_dropdown_arg which we pass to the method html_dropdown we will see more about this method in the next section
In the variable $drafts_dropdown_arg the options index has the value to show in the dropdown
The container index has the class name to add to the dropdown component’s container div
The next two indexes label and select represents its tag name, and it holds attributes of that tag in the inner array as key-value pair
The method html_dropdown (main source code line no: 399) is used to generate HTML dropdown dynamically which is wrapped inside container div also to be clear this method needs to be added to the utility class Helper therefore the same method can be used in many other places too but for this tutorial, I added this inside the same class
This method is simple string interpolation of passed argument into the custom HTML it’s pretty easy to understand, and I believe there is no need for a very detailed explanation
Sortable Column
The method get_sortable_columns (main source code line no: 434) is an overridden method that simply returns an associative array
Line no 11: the key is the column internal name and the value is an array that represents the behavior of the sorting
Here we followed the format 'internal-name' => array( 'column', 'is_descending')
The boolean false is no need to pass explicitly (see implementation logic) but for clarity here I passed instead of that if you alter it to true means on initial page load that column will be sorted in descending order
Column CSS
This anonymous function (main source code line no: 448) inject custom HTML in the header part because we used the admin_head tag (this snippet only load in the admin part, not for the user-facing frontend pages if you would like to load on frontend then use the tag wp_head)
Line no 9: fetch the current page name from the global get query string
Line no 10: check the page name is not equal to all-drafts then bypass the upcoming execution by executing the void return statement
Line no 15: add CSS width property to the column type i.e. post type column therefore which will give more space or real-estate to the column Title
Admin Menu For Drafts Table
Using the hook admin_menu (main source code line no: 465) we hooked our drafts table admin page
add_menu_page for more details about each argument and its purpose
Instantiate Draft Table
The function bootload_drafts_table (main source code line no: 483) is a callback function attached to the add_menu_page, we pass this as a second from the last argument
Line no 7: instantiate custom admin table class Drafts_List_Table
Line no 12: pass draft table page menu slug all-drafts as hidden value therefore whenever the user does a submit action like searching, after every new request the filtered table is shown at the right page
Line no 15: the method prepare_items is the workhorse of this class which handles all table data generation and processing logic
Line no 16:search_box is the overridden method that accepts two parameters are a label of the submit button and an HTML id attribute for the search input field here we pass the first argument i.e. label as Search and the second argument i.e. id as search
Line no 17:display is a parent class method that is responsible for displaying or echoing the HTML table with dynamic data, actions, filters, and pagination
Conclusion
Through this tutorial, you learned how we can create a custom admin table on WordPress
Simultaneously using this knowledge you understand how WordPress posts, pages, and comments table are formed
Not only WordPress core many plugins like WooCommerce, SEO by Rank Math, and many other plugins more or less follow the same procedure therefore it’s easy for you to understand their admin table source
By learning this tutorial now you’re comfortable with WordPress core class WP_List_Table
In this tutorial, you will learn to add dropdown which controls maximum how many products to show on a page.
This tutorial is the continuation of custom sorting tutorial
We will add a dropdown with selection options 4, 8, 16, 32 and All to control our products per page logic
We will add our code logic to our existing plugin repository in GitHub in a new branch v2
For your easy understanding of the logic lets, we see each and individual method with its filter separately in it’s each section instead of skimming the code from top to bottom
Lets we examine each part individually to understand the logic crystal clear
Explanation: Adding query string variables
Here we will explore the snippet of the method add_query_vars_products_per_page from our plugin class VG_Sort which add our query variable show to the query variable array
Direct link to the method in code repository branch v2
This method accepts a single parameter $vars on line 8 (line 8 is relative to the snippet, not the full code in repository this applicable to the upcoming explanations too) which holds all the publicly allowed query variables
On line 9 we added our query variable show which accepts the number of products to show per page
Once our query variable string also appended to the existing query vars array we return the variable $vars
This whole method is a callback method which attached to the filter query_vars please check the line number 15 for better understanding
Now we can use the query var show in our code we will see that in the next section
Explanation: Method controls product per page
Here we will explore the snippet of the method custom_products_per_page of the plugin class VG_Sort this method is core logic which controls the number of products to show per page
Direct link to the method in code repository branch v2
This method accepts a single parameter $per_page which accepts integer value by default WooCommerce assigns 16
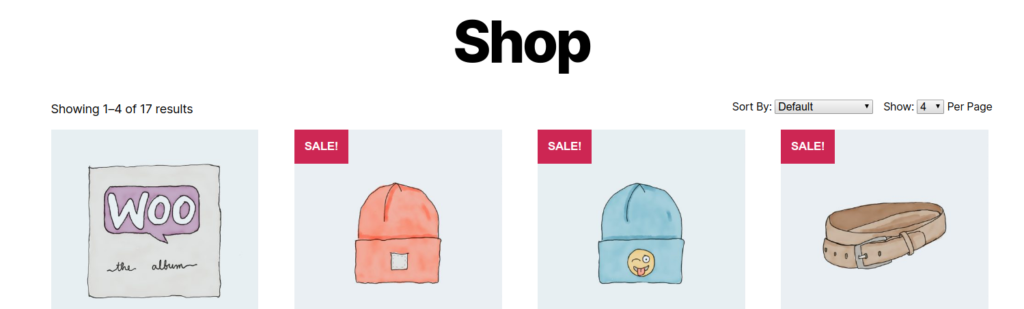
The shop page more technically we can say product archive page which shows 16 products per page
Now we will change this argument variable $per_page value to see how this affect the number of products showing on a page
On line 10 we are using the WordPress helper function get_query_var which is used to fetch variable for WP_Query class we already appended our variable show we can use that in the query string
The function get_query_var holds the two arguments the first one is query string variable’s name the second one is the default value if the query string show is not added in the URL
From line 13 to 24 we used the switch case which handles how many products to show
Inside the switch statement if the variable $count matches with any case statement for example if it is matched with 8 then $per_page assigned with the value stored in variable $count
If the $count not matched with the any of the case statement then default value of 16 will be assigned to variable $per_page
At last, we return the variable $per_page
Once you attached this callback method to the filter loop_shop_per_page, you can test this functionality by passing query string like http://example.com/shop/?show=4 to your shop page directly
Explanation: Template For Product Per Page Dropdown
In the previous section, we implemented core logic behind the number of products to show in a page and we tested it by passing value for the query string show
Lets we see the method template_products_per_page of the class VG_Sort
Direct link to the method in code repository branch v2
On line 9 we call the method wc_get_template which is responsible for rendering the dropdown for products per page logic
This method first parameter is template name, in the method we used products-per-page.php
The second parameter is an optional array parameter where we can pass any value to our template by passing an associative array
The third parameter is denoting the template path
The fourth parameter is where we pass the path for our template which points to the directory templates which is present inside the plugin directory itself
The function plugin_dir_path identifies the plugin directory by accepting the file name here we use PHP magic constant __FILE__ which returns the file name with the full path
We append the string templates/ to the plugin_dir_path returned string which is point to the directory present inside our plugin root path
On line 12 we hooked our method to action function woocommerce_before_shop_loop which call our render method template_products_per_page before products rendering
On that time, our HTML content present in the path plugin-root/templates/products-per-page.php will be outputted on the archive page
Explanation: Dropdown HTML
In the previous section, we saw how our template is outputting, now we will see the HTML part of that rendered template plugin-root/templates/products-per-page.php
Direct link to the template in code repository branch v2
The HTML is straight forward so will explain important aspects only instead of explaining like what is form, label, etc
On line 7 for our form, we added our class vg-sort-show to the class attribute
On line 9 for the select tag, we added the attribute onchange with the value this.form.submit() which triggers the form submission when we change the value for e.g. from 4 to 16 it will trigger the form submission
In every option tag, we called the WordPress function selected which accepts three parameters and outputs selected="selected" attribute
The first parameter holds the first value to compare
The second parameter holds the second value to compare (which is optional)
The third parameter is control whether to echo the selected attribute or not (which is optional)
On line 17 the function wc_query_string_form_fields (official documentation) is used to outputs hidden form inputs for each query string variable
Explanation: Dropdown CSS Enqueuing
We are reached the final section of this tutorial this part is responsible for styling and positioning our products per page dropdown
Direct link to the method in code repository branch v2
Lets we explore the method add_assets of the plugin class VG_Sort
On line 9 we imported our CSS main.css which is located in plugin-root/assets/css/main.css using WordPress function wp_enqueue_style the first parameter is handle name it should be unique and the second parameter is CSS file’s URL
plugin_dir_url is similar to plugin_dir_path but it returns URL instead of filesystem directory path which is appended to our CSS file
This callback method is hooked to the action wp_enqueue_scripts on line 12 which is responsible for register and enqueue our asset file in the rendered HTML page
Explanation: Dropdown CSS File
The CSS file is located in the path plugin-root/asset/css/main.css
Direct link to the CSS file in code repository branch v2
On line 1 we are applying our CSS to form class vg-sort-show
On line 2 we provided rule float: right to move our form towards the right end of the parent element
On line 3 we applying o to both top and right margin 1rem to bottom to align parallel to the sort dropdown and to provide spacing between this and sort dropdown added 1.5rem to margin left
On line 4 applied padding 0.75rem to top and bottom then 0 for left and right
For CSS I referred CSS class woocommerce-ordering of official WooCommerce layout CSS (just inspect the default sort by dropdown form and apply whatever CSS opt for you by referring that)
Conclusion
You learned totally new concept when compared to previous tutorial, instead of altering existing one you added something brand new product per page dropdown
Learned to create new HTML template and render it on the fly with help of a hook function
In this tutorial you will learn how to add custom sorting for the product archive page
Renaming the existing sorting option
Re-ordering the option in sort dropdown
Overriding sorting form template and add meaningful title for the sorting dropdown
Quick overview of how to create plugin (Yes, all our customisation are plugin based except adding title to the sorting dropdown)
Quick Overview Plugin Creation
Go to the following path wp-content/plugins in your WordPress Project
Create a new directory and name it like vg-woo-sort
For naming the plugin I follow the following convention either my initial or project initial hyphen plugin name
Inside the directory vg-woo-sort create a new PHP file vg-woo-sort.php
Once you created the file, for security purpose add this line first which blocks the direct access to our script
Then add few plugin headers (Plugin Name is must)
Finally go to your Plugins menu in WP Admin Panel you will find your new minimal plugin kindly activate it
Customise Sorting Dropdown
WordPress plugin functionalities can be developed either by procedural or object oriented
Our plugin is developed through object oriented even though it’s simple
Our plugin class VG_Sort has two callback method custom_woocommerce_get_catalog_ordering_args and custom_woocommerce_catalog_orderby
Lets we see each method’s inner working in its individual section
Plugin & Template Full Code
You can find the full code for both plugin and template code in github
The plugin’s core code
The template’s core code
Explanation: Ordering Method
Here we will explore the snippet of the method custom_woocommerce_get_catalog_ordering_args from our plugin class VG_Sort
Here and in all explanation sections the line number denotes each individual snippet’s line number not the full code section
In line no 7 our method accepts single argument $args which is associative array which represents the products sort ordering configs
For inspection purpose once you attached this method with the filter function add print statement print_r($args) next to line 7 and refresh your shop page
In your shop page at the top the argument $args array is printed
Here is the sample for the default sorting option Array ( [orderby] => menu_order title [order] => ASC [meta_key] => )
The first key orderby holds two sorting values
Firstly it sort with menu_order and then product’s title
menu_order which can be adjusted to each products in their backend product edit page
By changing the Menu order value for individual product which is under the container product data you will find set of tabs, in that tabs click the Advanced tab
By changing the number from 0 to any number positive value which push the product to last and negative value will pull the product to the first
If, for more than one product the Menu order is same then it will sort by title
The key order is used to arrange the products either in ascending or descending
The key meta_key is used to sort the product based on some custom key
In line 8 we assign $orderby_value variable by checking the get query string parameter if it’s set then we sanitise it using WP sanitise function wc_clean else assign it from option using WP function get_option which retrieves an option value for the passed option name
The line between 13 and 19 is the core logic to create new sort order for the product archive page
In both conditional statement we compare the get parameter value with the desired order by string and alter the $args parameter (for $args key-value we already discussed in 5th point please refer that if you need to explore more)
Finally in our callback method we return the variable $args
Explanation: Rename & Reorder Method
Here we will explore the snippet of the method custom_woocommerce_catalog_orderby from our plugin class VG_Sort which is used for renaming & reordering
We assume that you attached/hooked this method to the filter function woocommerce_default_catalog_orderby_options and woocommerce_catalog_orderby then only whatever you print and check will work
This method’s main functionality is renaming and reordering the sort dropdown to do that first we need to know the selection option’s name and its display value
So kindly add print statement print_r($sortby) next to the line 2 i.e. after the method definition and refresh the product archive page to check the argument array’s key-value
It will print the array like this Array ( [menu_order] => Default sorting [popularity] => Sort by popularity [rating] => Sort by average rating [date] => Sort by latest [price] => Sort by price: low to high [price-desc] => Sort by price: high to low ) just above the sort order dropdown
As you clearly noted the key, you came to know that now we will override this array’s value also we reorder the key
We override it from the line 3 to 12
If you don’t need any one of the ordering for example if you don’t need default order [menu_order] => Default sorting then remove that key value from the array
We renamed each sort order by overriding the value like from Sort by average rating to Average rating
Our new array constitutes our new sorting key-value too to display option to sort the product alphabetical or reverse alphabetical
Finally we return the variable $sortby
Explanation: Callback’s Filter
We used totally three filters namely woocommerce_get_catalog_ordering_args, woocommerce_default_catalog_orderby_options and woocommerce_catalog_orderby
woocommerce_get_catalog_ordering_args is the filter action deal with sorting operation
Our custom template constitutes a minimal change to clone of core template we will see detailed explanation
While exploring the filter action woocommerce_default_catalog_orderby in official documentation which is present inside the function woocommerce_catalog_ordering
As you skim down to the end of the function you will find at the last it calls the function wc_get_template with the first parameter as loop/orderby.php
Based on our analysis we have to override the partial or sub template orderby.php which located inside the directory loop of the WooCommerce plugin templates directory (To understand the overriding concept read the article about template overriding)
We copied the loop/orderby.php into our current theme in the following path woocommerce/loop/orderby.php
Now we can start rewrite the HTML in our newly copied template orderby.php
We enclosed our select tag inside the label tag and prefixed the select with the string value Sort By: (as you see now there is no repetition of sort by string inside the option)
Conclusion
You learned to add new sorting to your existing product archive page
To modify the existing sort option
To modify the template which render the sort order select option
Now you have a clear understanding about sort order dropdown
We covered all the logic and modification related to the sort order dropdown now you are solid to modify in and around of products sort order
For every task there are many good and bad ways to do that
WooCommerce theming also fall under this prey like directly editing the WooCommerce template files
In one fine day WooCommerce may release a new version, you unintentionally update the WooCommerce plugin which results in replace of your beautiful custom shop page into default template
So to avoid this we have to override our WooCommerce template in our theme directory
Let’s we see it in detail
Detect Template to Override
To detect which template your current page renders you can place this snippet in your activated theme’s functions.php file
Let’s we see the explanation for this snippet
On line 2 of the snippet we using WordPress provided API helper function add_action which hook our function (we pass it as second parameter) in specific point or event in the context of first parameter (the action’s name wp_head technically it is called as tag)
add_action accepts totally 4 parameters in that 2 are mandatory
The first parameter (mandatory) is tag which is the name of that action hook like wp_head, muplugins_loaded, shutdown
The second parameter (mandatory) is the function to be called at the time hook action triggers
The third parameter (optional) execution priority
The fourth parameter (optional) is accepts number which denotes number of arguments the hooked function accepts
In our anonymous function we echoed global variable $template which output the full path of the rendering template file
Override Product Listing Page
Assume that you declared the template path identifying snippet in your theme’s functions.php file
Go to any page in your WordPress you will find at the top of your page the rendering template’s file path
Now go to your shop page where you will find the template path as in the given image
Now we will override this without disturbing the original file
In order to do that first create a directory with the name woocommerce in your active theme directory for example wp-content/themes/twenty-twenty-child/
Copy the template file archive-product.php from WooCommerce plugin for path reference see the image in 3rd point and paste it in your newly created directory woocommerce i.e. inside your theme
Hurray! You succeeded you learned overriding the WooCommerce template
Edit Customised Shop Page
To check whether we correctly implemented we will change few things in copied file archive-product.php in our theme directory not in the WooCommerce plugin’s template directory
Open the file and replace the header section with the following snippet
If you has an eagle eye you clearly note that the change is one line
In line 3 changed the h1 text case to upper
By default WooCommerce function woocommerce_page_title echoed the title instead of that we passed boolean false as first parameter to that function to return the title as a string
woocommerce_page_title function’s return is passed as an argument to the php string function strtoupper
Now if you refresh your shop page you will find that the title is uppercase
We only covered tip of the iceberg of WooCommerce to customise archive page
Conclusion
You learned why must avoid overriding the WooCommerce plugin’s template directly
You understand the basics of action hooks and some action hook tags
You can able to detect the current page’s template
You can able to modify the WooCommerce template file without disturbing the plugin’s template directory
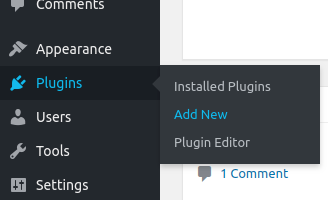
In left menu hover over Plugins menu. In sub-menu click Add New
Once you clicked Add New sub-menu it will be redirected to Add Plugins page.
In the Add Plugins page’s search field enter the keyword as woocommerce.
For reference please see below image at the top right corner (which is highlighted in red stroke/border) there is search field
In the grid of cards click the install button (highlighted in red stroke/border) in the WooCommerce card which is at the position 1 in the attached image
Once you installed successfully click the Activate button (for reference please see the below image with highlighted stroke/border)
After the successful activation of WooCommerce it will redirect to setup wizard these steps are optional either you can skip now by clicking the link “Not right now” or fill it
Click the Let’s go! button (refer 4th point you will find button at the last)
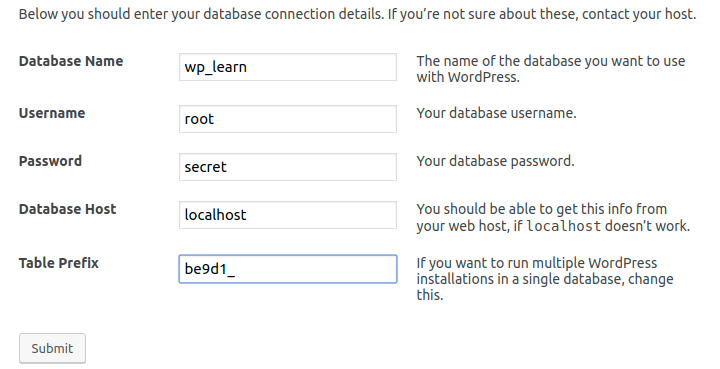
You will be redirected to the following screen
By seeing the image itself you will get a clear idea what to enter
If you are closely noted the table prefix is replaced from default wp to random string for the security purpose
Though this random string table prefix is simple one this will be the first step to add a security to your site
Sometimes if you don’t have a proper permission in your Linux server you will face the following error
Run this shell command with apache’s user/group
In Ubuntu the shell command is sudo chown -R www-data:www-data /var/www
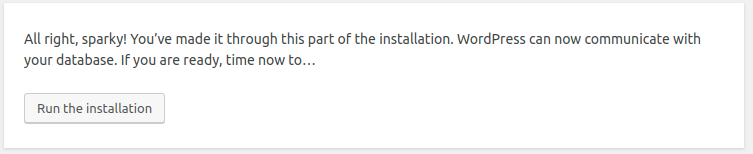
After executed the shell command chown refresh the installation screen in your website then the screen will be similar to the following image
Once you clicked the button Run the installation the following screen will appear
Click the Install WordPress button it will install the WP and you will be redirected to the following final screen
Once you click Log in you will be redirected admin login if you like do administration work enter your credential detail and get logged-in else enter your website URL you will be redirected to the home page